
Please watch these videos for more tips and tricks when painting this design!
Supplies For Sleeping Beauty Shoe
- Left Shoe
- Lighter
- Paint- Liquitex Basics - Titanium White, Cobalt Blue Hue, Medium Magenta, Cadmium Red Light Hue, Cadmium Yellow Deep Hue, Gold.
- Paint brushes- A shader for larger shapes, and a spotter/round for tiny details
- a cup with water- to rinse off brushes
- a Pallette
- Fine line detail pens/markers
- Patience
Supplies For Sleeping Beauty Shoe
- Right Shoe
- Compass
- Paint- Liquitex Basics - Titanium White, & any colors you desire!
- Paint brushes- A shader for larger shapes, and a spotter/round for tiny details
- a cup with water- to rinse off brushes
- a Pallette
- Fine line detail pens/markers
- Patience
Conceptual image

(Light Pink paint, I use Medium Magenta mixed with Titanium White
Start off by painting a very SMALL and THIN rectangle underneath the seam on the front of the shoe
(in this example, I am painting on the left foot shoe)

Create a Larger Rectangle as seen below

Add 2 smaller rectangles along the top sides, about the same thickness as the small middle rectangle but not the same height. The center Rectangle must remain slightly higher and do not paint past the seam of the shoe

Extend a thin line of paint to the sides of the Large rectangle

Start to paint a large tower along the right side of the castle shape
In this photo I chose to leave a small triangle unpainted, as this will be painted blue later.

Continue to paint the tower beyond the seam on the shoe

Just above the crease of the shoe, widen the sides of the castle tower and create the first turret

Leaving a small gap, paint another turret on the left side of the castle
Toward the top of the Turret connect the two shapes and give them an angle or curve toward the top of the connection point

Start painting a second turret around the top of the large tower on the right

Please check the concept image, and paint a small pink square just to the left of the 1st turret and just left of the center of the painting. Also you can add the large spikey tower to the right, or this can be done toward the end using just gold paint. The option is yours!

Toward the bottom of the large pink rectangle paint small squares no larger than the thickness of your shader brush, and remember to paint a few coats to make sue the textures match.

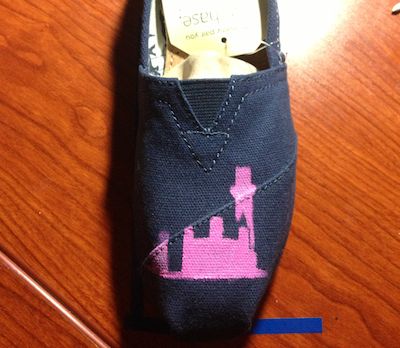
With your Blue Paint, start laying down a base coat in the shape of a triangle above center of the castle

To save time, also paint a layer of blue underneath the pink castle shape, remember to leave a portion blank that will be where the drawbridge and "partners" statue will go


Remember to let each coat fully dry before painting another

Paint the tops of the towers and turrets with blue triangles as seen below

Mix your blue with a bit of white and start to add in little spots of light blue paint with your "round"/spotter/detail brush to give the roof a tiled look.

Continue to add more small spots along the tops of the towers. By painting more toward the left side of the towers and painting fewer dots toward the right side you can give the effect that the castle is being somewhat lit up from the left due to the Firework we will add at the end.


Once again using Light blue paint, start to add in the detail of the bottom of the castle, create light blue turrets on the sides.

Fill in some of the shapes toward the bottom and even use a bit of light blue paint on the large pink tower on the right, again to help give a lighting effect

By mixing, pink and blue, paints with titanium white you can achieve a light purple color that can be used to paint a zig-zag lines across the roof on the right of the castle, alternate with pink paint, and light blue to give the roof a nice tile pattern.
You can also use the same color paints to paint a portion of the roof of the far left side of the castle (see concept image, and video for reference)
You can also use the same color paints to paint a portion of the roof of the far left side of the castle (see concept image, and video for reference)

Mixing your "orange", yellow, and titanium white paint, create a light yellow with an orange glow to start painting in the windows on the upper part of the castle

Use the same light yellow/orange paint to start adding the lamps near the drawbridge

Create 2 lamps on each side of the drawbridge portion of the castle

In the bottom center of the painting, paint in the area over the drawbridge in light yellow/orange, remember to paint multiple coats, and let each coat fully dry before painting another,

you can use the same yellow/orange paint to add detail to the large spikey tower on the right or you can also use gold paint for a nice effect as well

Usinge your black fine line detail pens you can start adding details to the bottom blue portion of the castle and even outline the yellow windows on the top portion of the castle

create crossed lines in the large yellow windows of the castle, to create the look of iron bars

Add small crosses in the faces of the small towers, and add small doorways and windows to the larger towers. Divide the Large pink rectangle by creating a straight line across the top of the bottom windon and extend it to where the small towers begin on the sides. Do not make the line all the way across the paint

Create a small pattern of "X's" underneath each small tower toward the center of the painting

Using the same "X's" pattern fill in the center of that line all the way across

Add more lines and details to the bottom portion of the castle using the concept image as a reference. Remember it doesn't have to be perfect and make the artwork special by doing it your way!

Using the same "X's" pattern create small lines across the bottom of the pink portion of the castle

Using the thicker pen you can create triangles pointing downward just underneath each lamp to give the effect of banners that are in the shadows

Across the top of the large yellow doorway at the bottom of the painting, make 2 thin straight lines across and many small straight lines up and down to look as if a gate has been raised

Using the concept image as reference add in a small basic version of the partners statue inside the yellow/orange doorway at the bottom.

Now that the Castle is finished, we can add the Mickey Mouse shaped Firework
using a very light yellow or gold paint, create 3 light circles in the shape of a Mickey Mouse head. These circles should be light and do not neeed to have very thick paint.

Create small lines for the fireworks, leaving space in between each line to create more later. Give each line gravity, the lines that shoot out to the sides should droop down toward the end, and lines that go straight up should be short and the lines that go straight down should be a little longer.

continue to fill in alternating lines in different lengths to give the feel of an explosion

Once you have filled in all 3 circles with explosion lines, check to make sure there are no parts that need touching up

and there you have it your Sleeping Beauty Castle with Hidden Mickey Firework

World of Color Shoe!

Using your compass, create a circle in pencil on your shoe, the circle should touch the bottom of the "V" shaped seam toward the top of the shoe, and also touch the top of the diagonal seam going down the middle of the shoe. Once you have your circle made, paint over it in white paint, make your line a few mm thick.

Create a cross right through the center of your circle, and taper the lines so that they are thicker toward the center and thinner towared the edge of the circle.

Create another cross perpendicular to the other cross, and then create small spikes in between the 8 lines you've just made.

While the Ferris Wheel dries, Trace a diagonal line just above the seam in the middle of the shoe, and have it end toward the bottom of your Ferris Wheel and also have the top of the line curve downward toward the left of the shoe. Create an additional line that will be the top of the California Screamin Roller Coaster

Create a small white circle in side the left shape. This will be the loop area on the California Screamin Roller Coaster

Make Vertical lines to create supports of the RollerCoaster

Continue on the the second hill of the Roller Coaster

On the left hill, create horizontal lines to create a grid.

On the right hill, create diagonal lines just for a little variation

Now that the Ferris Wheel is dry, we can extend the little spikes into full on spokes of the wheel

If you'd like you can add even more thin lines in between to really flesh out the Ferris Wheel.

Toward the center of the shoe, create small fountain lines in a staggered pattern, this will become our World of Color show

Continue making the staggered fountains across both sides of the shoe.

more fountains!

Because the World of Color show has many different patterns, you can create the fountains however you'd like, but this is just how they match up to the concept artwork above.

Some Fountains are taller than others so be sure to use different length lines

at the bottom of each fountain line create small horizontal "splash" lines

Continue until all the fountains have small splashes underneath them

Once the fountains are complete, you can begin to add color, I always paint the inside of the Ferris Wheel yellow, but as for the fountains and the rollercoaster, I paint a different color scheme EVERY TIME! So get creative and have fun. DO WHATEVER YOU WANT and just HAVE FUN!
When it comes to painting the Mickey Mouse in the Center of the Ferris Wheel, Consult the reference image and just try your best. Because it is soooooooo small, he is very hard to perfect, even for me, o just take your time, and once you feel it looks right, just move on!
If you wanted to take your shoes a step further, you could add pixie dust along the side and even a small Tinkerbell above the castle as seen below


No comments:
Post a Comment